Deploying to AWS has become a common occurrence but it’s a more than just launching an EC2 instance with a public IP. Below, we explore how to setup a VPC to deploy a basic web app in an isolated and secured manner.
The guide I’ve used to accomplish this is from Flux7 blog post but it hasn’t been updated in a long time. I wanted to create an updated version, leveraging the changes AWS introduced over the last couple of years.
While this how-to is a good start to a secure environment, there is plenty more one can do to fully-secure a deployment. For our tutorial, we’ll focus on a handful of concepts to configure the infrastructure needed to run a basic web application using RDS for our database.
We will cover:
- Setting up a VPC
- Using Security Groups to control network access to our resources
- Basic networking in a VPC environment
- Setting up NAT gateway
- Setup Bastion server access
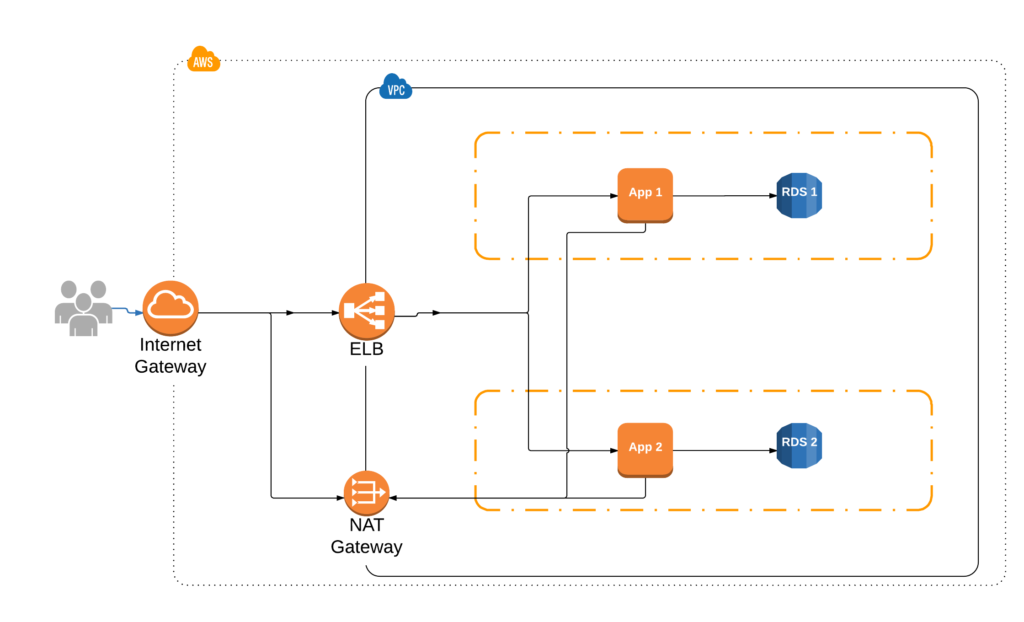
Our approach is to separate the different components into their own silos and protect access through the use of Security Groups. By keeping all of our instances in their our subnets, we can control what other subnets and network resource they have access to by simply updating the routes table. Likewise for security groups; if we want to open connectivity to multiple ports or allow access from other types of resources (e.g. background workers), we just need to update a security group.
This prevents us from having to manage firewalls on individual servers and let’s us add/remove resources, almost, at will.
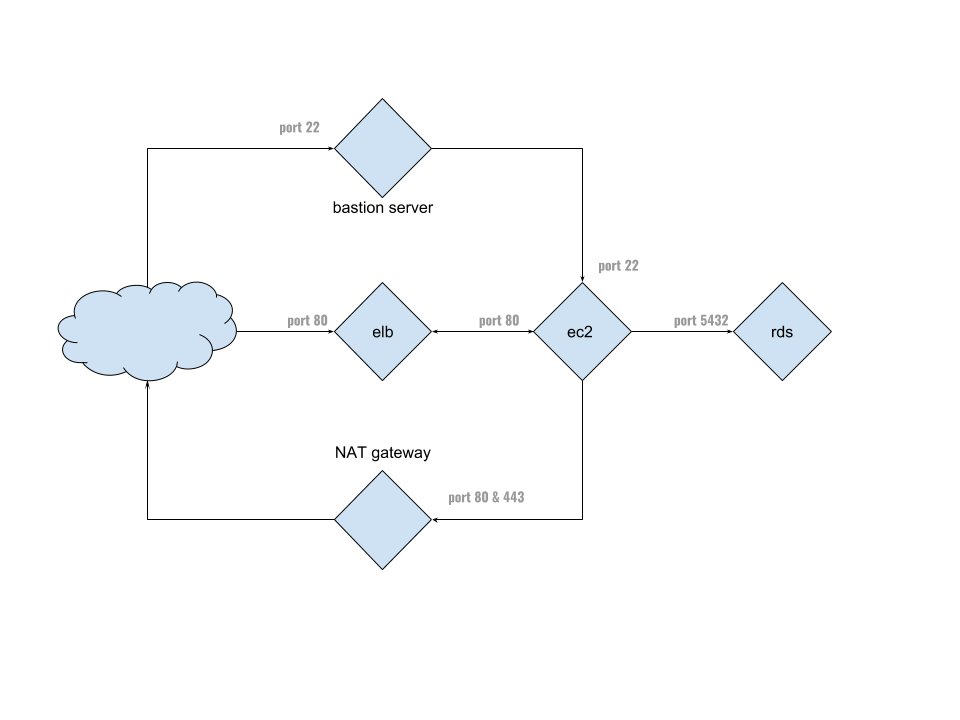
Here’s the architecture we’re going for:
This how-to assumes basic familiarity with ssh, networking and subnetting, plus an AWS account. If you’re not familiar with those topics, Google is your friend.
With that in mind, let’s begin by logging into the AWS console and creating the VPC.
VPC
I’m using US North Virginia, which is us-east-1. Feel free to use whatever fits you. One note of caution, the availability zones are not the same across all regions, so pick the ones you want to use and stick with them.
At the top, click on Services -> Networking & Content Delivery -> VPC -> Your VPCs.
Click on Create VPC button and let’s fill out the form:
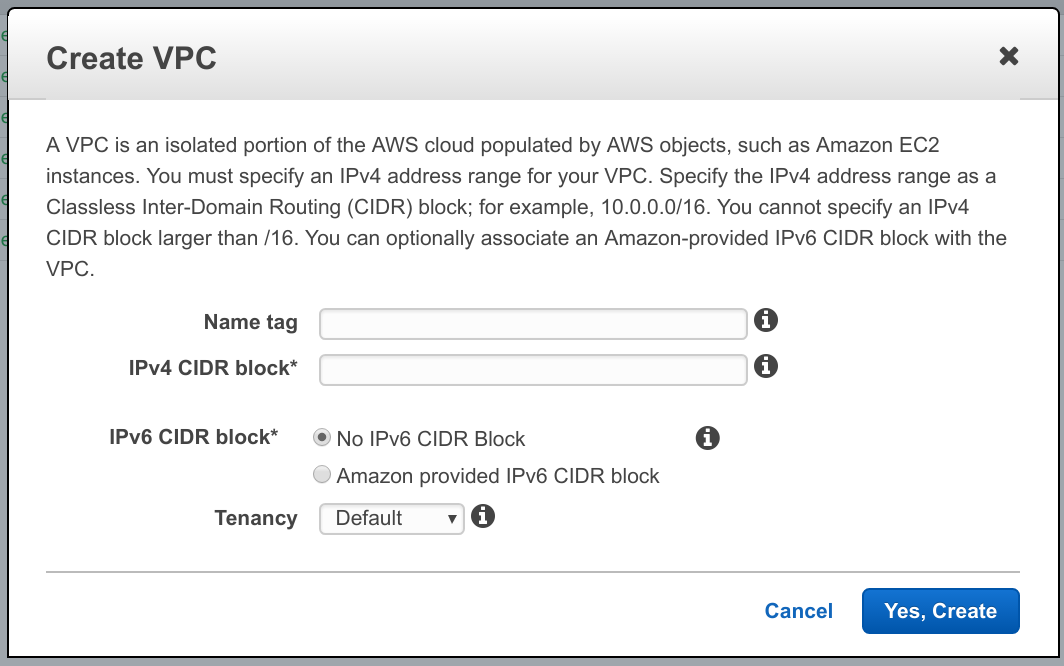
- Pick a name you like, I’ll use vpc-how-to
- For CIDR block, you’ll want to reserve enough IPs for your app but not so much that you can’t create any more networks. For tutorial purposes, let’s use 10.0.0.0/24. That will give us 128 address block, which is enough for everything we want to do.
- We’re not going to cover IPv6, so leave that as default
- Tenancy is something you should read about, but we’re going with default
- Click Yes, Create button.
Networking
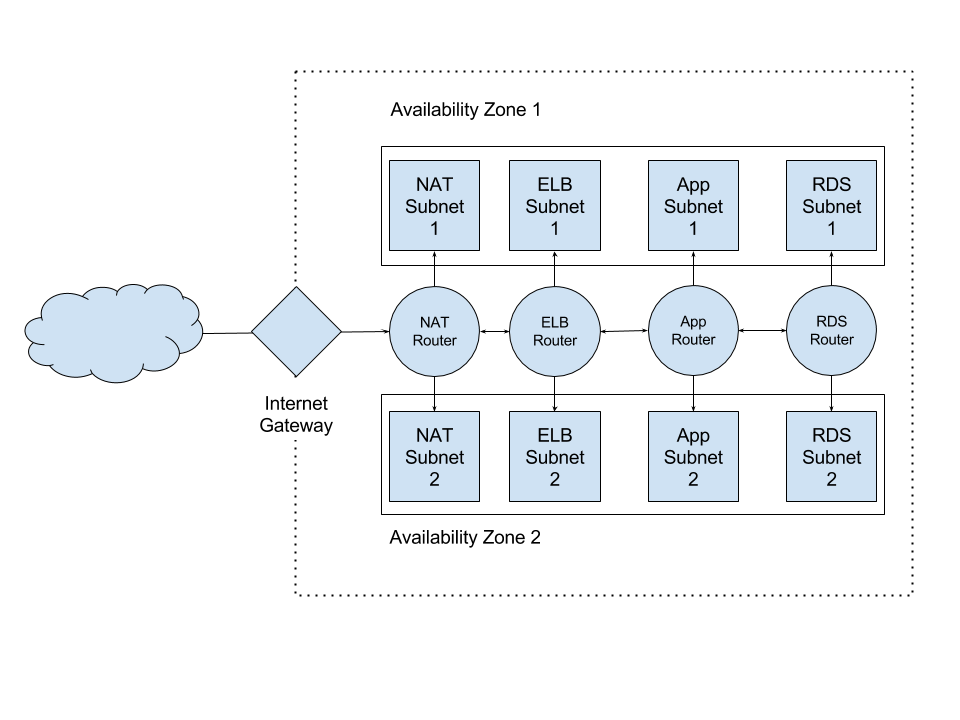
Our network is split up across two availability zones. You’ll want to run your application across multiple zones to ensure high availability. Furthermore, RDS requires you to launch DB instances into multiple availability zones. Lastly, it’s just a good practice.
Here’s what we’re aiming for with our network:
Internet Gateway
Now that we have our very own private cloud to play with, let’s create a way for it to talk to the outside world. This is accomplished through the Internet Gateway.
Click on Internet Gateways, it’s in the left-hand menu, and Create Internet Gateway button.
Give it a name, I’ll use vpc-how-to again.
Once you see it in the list, select it and click Attach to VPC button. Select the VPC you created earlier from the drop-down and click Yes, Attach.
It should show up with attached as the State in green.
Now that we can talk to the internet, let’s setup the subnets for our application components.
Subnets
As you can see on our diagram above, we’ll have two subnets per each network layer; one subnet per each availability zone. We want to separate different portions of our VPC into subnets to help control network flow and access.
In AWS there are “public” and “private” subnets. Public subnets are the ones connected to an Internet Gateway and private subnets are not. This is just a naming convention but helps to define boundaries within out network.
Let’s create the subnets we need by click on Subnets link in the left-hand menu of VPC section, and then Create Subnet button.
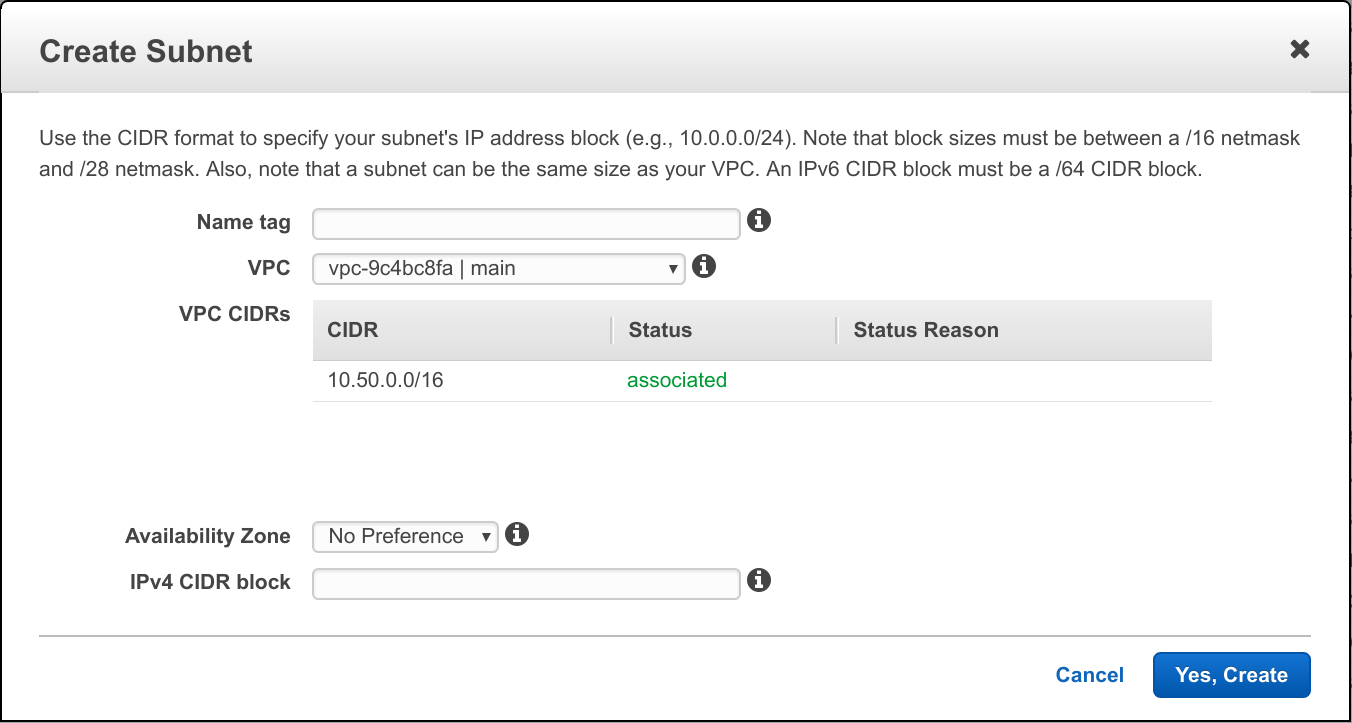
- For name, use app-1
- For VPC, select the one we created earlier (I’m using vpc-how-to)
- For Availability Zone, select us-east-1a (if you’re in N. Virginia region)
- For IPv4 CIDR block, we’ll go with 10.0.0.0/28 – that should be enough IPs
- Click Yes, Create button
Now repeat the same for the rest of the subnets with the IP blocks as follows:
- app-1: 10.0.0.0/28 & us-east-1a
- app-2: 10.0.0.16/28 & us-east-1b
- rds-1: 10.0.0.32/28 & us-east-1a
- rds-2: 10.0.0.48/28 & us-east-1b
- elb-1: 10.0.0.64/28 & us-east-1a
- elb-2: 10.0.0.80/28 & us-east-1b
- nat-1: 10.0.0.96/28 & us-east-1a
- nat-2: 10.0.0.112/28 & us-east-1b
- bastion: 10.0.0.128/28 & us-east-1a
Route Tables
Next step is to connect the subnets so they can talk to each other and we that via route tables.
Click on Route Tables in the left-hand menu and Create Route Table.
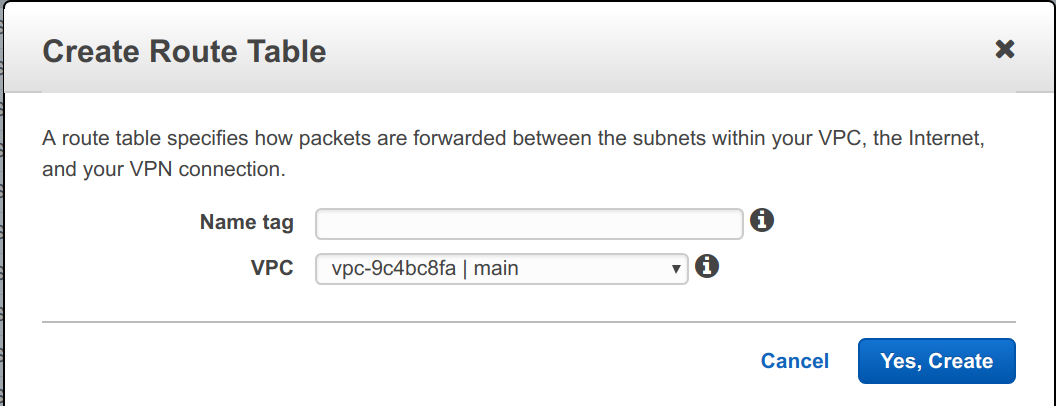
For name, use app and for VPC, select our VPC from above and click Yes, Create.
Next, select the route table in the list, if it’s not selected already and go to Subnet Associations tab:
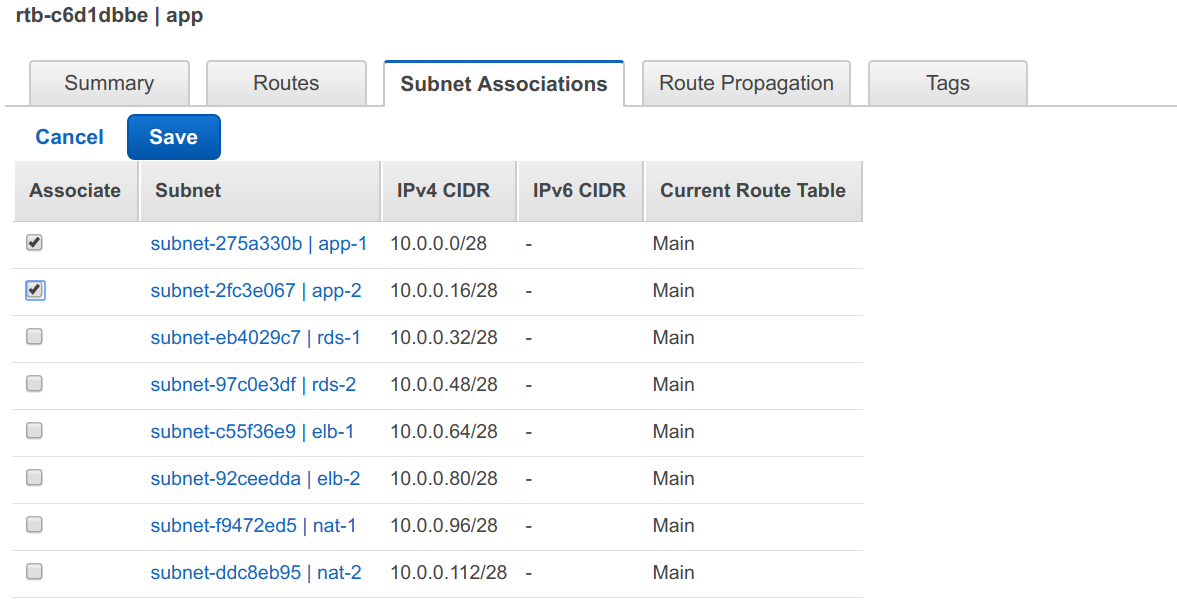
Click on Edit and select the two application subnets, app-1 & app-2 and hit Save.
Now repeat the process for the rest of the route tables associating the subnets
as followes:
- rds – rds-1 (10.0.0.32/28) & rds-2 (10.0.0.48/28)
- elb – elb-1 (10.0.0.64/28) & elb-2 (10.0.0.80/28)
- nat – nat-1 (10.0.0.96/28) & nat-2 (10.0.0.112/28)
ELB Routes
Last thing to do is allow ELB to receive internet traffic. We just repeat the same process as above:
- Select the ELB route table and go to Routes tab, then hit Edit button.
- Click on Add another route button and enter `0.0.0.0/0` for Destination column and when you click into the Target entry, you’ll get a drop-down for the internet gateway we created earlier, it’ll be something like `ig-XXXXXXX | <vpc name>`. It should look something like this:
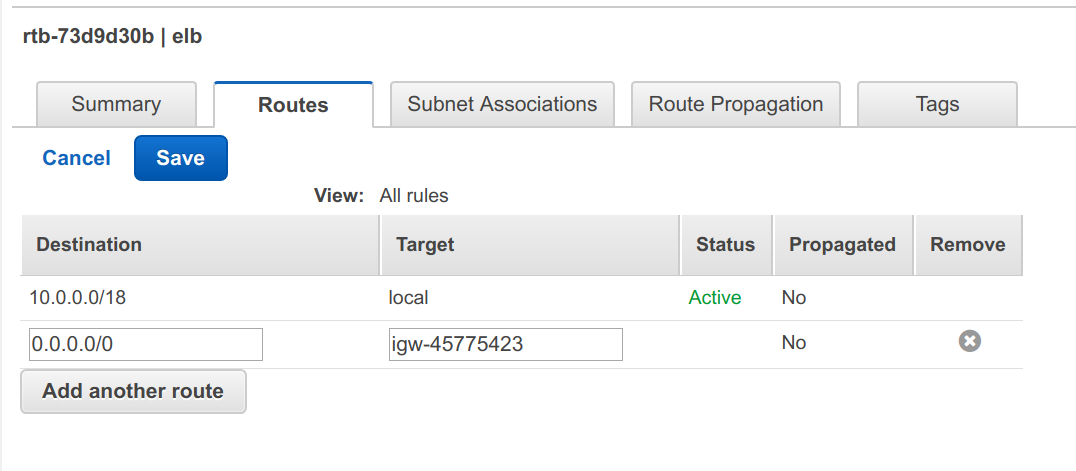
Hit Save button.
Main Route
You may have noticed a route table hanging around, that’s the Main route table
that AWS creates for you automatically. We’re going to use it for bastion
server access. If you can’t find it, type in the VPC name into the search box
and it’s the one without a name and has Yes under Main column.
Click on it and edit it’s Routes to have a route with Destination of 0.0.0.0/0
and Target as the Internet Gateway we created above.
We don’t need to associate the bastion subnet since it’s automatically added to
the Main route table.
NAT
We need to repeat the same thing for NAT route table, since NAT needs access to the Internet.
Click on it and edit it’s Routes to have a route with Destination of 0.0.0.0/0
and Target as the Internet Gateway we created above.
Now you could just use Main route table, but it’s nice to have a separate resource you can manage external to other dependencies.
Security
Now that we have subnets connected to each other, the next step is to restrict network communication between them. We do this with a set of security groups.
Here’s what we’re going for:
ELB
Create the first security group by going to Security Groups in the left-hand menu and clicking Create Security Group button.

- Name tag, enter elb
- Leave Group name the same
- Description, Web traffic only
- VPC – select the one we created above
Click Yes, Create button. Then select it in the list and click Inbound Rules tab. Then hit Edit button and make it look like this:
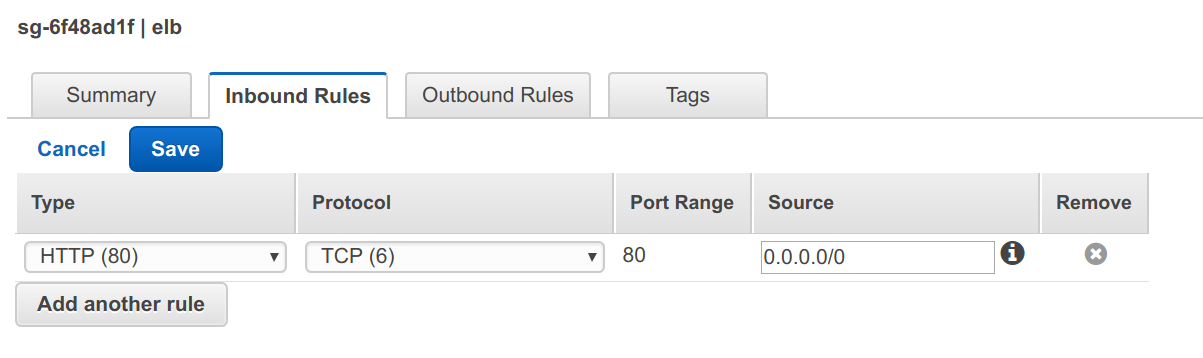
We’re assuming that our visitors will only request HTTP traffic. You can provide support for HTTPS, but you’ll need to upload an SSL certificate. You can learn more about that in the AWS docs.
Since our goal is to serve web traffic to everyone, we accept connections from everywhere for the ELB.
Bastion
Create a bastion security group with name `bastion` and a description you like.
We’re going to allow SSH access from anywhere so click on Inbound Rules tab and Edit button.
Change the Type from ALL Traffic to SSH and Source to 0.0.0.0/0.
Click Save.
APP
Next, let’s setup App. Create another security group with name app and description of app access.
We allow access to our app network from elb security group and only on port 80. We’re assuming that our app server is running on port 80, if not, change accordingly.
We’ll want to allow SSH access from out Bastion server, so add another rule with SSH as the Type and select the bastion security group for the Source.
Here’s what my rules look like:
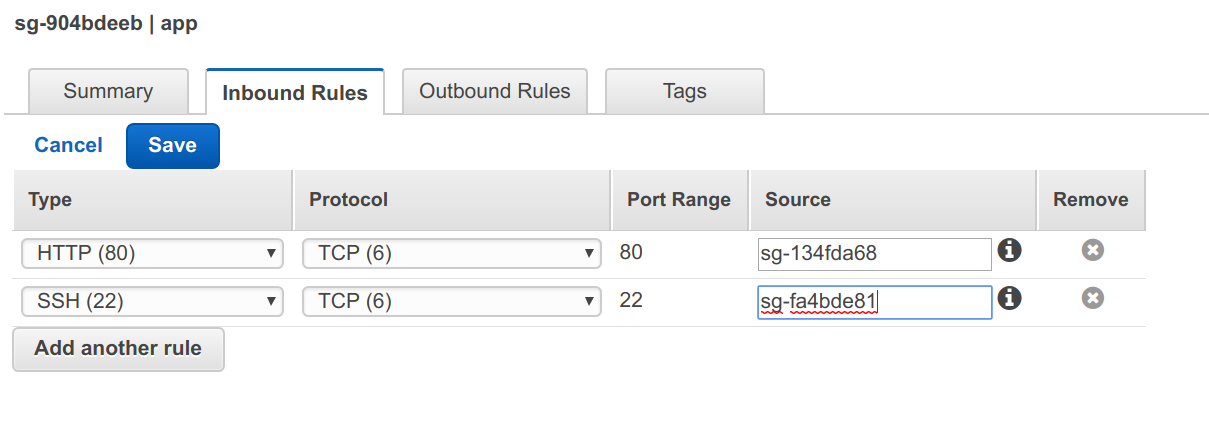
For the source, I selected the ELB security group we created above as I only want to allow traffic from the ELB.
RDS
Now let’s setup RDS access. I’m using PostgreSQL for my RDS type, if you’re using something else, adjust the ports accordingly.
Create a new security group with name rds and description PostgreSQL access.
Add rule to allow access on PostgreSQL port from app security group only.
NAT
Since our application servers are not connected to the Internet directly, we’ll need to allow them access through a NAT Gateway, but to do that we’ll need another security group.
For now, we’ll assume we only need to install software and download things, which means ports 80 and 443. If you’re going to be using external APIs to send emails or notifications, etc. you’ll need to open those ports as well.
Create a new security group called nat and provide a description you like. Then add HTTP and HTTPS ports with the source as the app security group.
RDS
Subnet Group
RDS uses subnet groups to launch RDS instances into. We’ll need at least two
subnets for this that we created earlier. Let’s create it by navigating to
Services -> Database -> RDS, then select Subnet Groups on the left-hand menu and
click Created DB Subnet Group button.
- Enter name and description that you like
- Select our VPC
- Select us-east-1a in the Availablity Zone and select the Subnet ID that corresponds to rds-1 (10.0.0.32/28)
- Click Add button
- Now select us-east-1b and subnet ID for rds-2 (10.0.0.48/28)
- Click Add button
- Click Create button
DB Instances
Now that we have established all the plumbing, let’s setup our database. Select Instances in left-hand menu and click on Launch DB Instance button.
Select PostgreSQL and click on Dev/Test option, since we’re still experimenting. Select your instance details. Under Configure Advanced Settings, select our VPC and subnet group from above.
Make sure it’s not publicly accessible and select our rds security group.
Fill out the rest to your liking and click Launch DB Instance.
App
Now we have networking and a database setup, the next step is to get an instance deployed.
For the purposes of the demo, we’ll use a standard Ubuntu AMI. For your application(s) you’ll want to set yours up to your needs. A tool like Packer can be very helpful there.
Let’s navigate to Services -> Compute -> EC2 and click on Launch Instance button. You should see an Ubuntu Server 16.04 AMI, select that one for demo purposes.
- Choose the type you want to launch and click on Configure Details.
- Under Network, select our VPC and either of the app subnets (app-1 or app-2).
- Click Add Storage and set to what you like or leave default
- Click Add Tags and add any tags you like
- Click Configure Security Groups
- Click Select an existing security group and select the app security group from the list.
- Click Review & Launch and then Launch
- Pick or create a key, you’ll need it to SSH into it later
You’ll want to run at least one server per availability zone in a more robust environment, but for the purposes of our tutorial, we’ll deal with just that one for now. Feel free to add another one in the other AZ to fully test out this setup.
ELB
Now we have networking, security, database and application server running let’s allow access to the server form the Internet.
Click on Load Balancers on the left-hand menu in EC2 section that you’re in.
- Click on Create Load Balancer button and select Classic Load Balancer. Setting up an Application Load balancer I’ll leave to you as an exercise.
- Give your load balancer a name
- Select our VPC in the drop-down
- Leave the ports on 80 and 80, unless your server runs on different port. This will let ELB listen to any incoming requests on port 80 and forward them to port 80 on the instances that ELB is managing.
- Select the ELB subnets we created earlier, elb-1 & elb-2 and click Next
- Select our elb security group only & click Next
- If you want to configure HTTPS and have the certificates, feel free to click back and add them, otherwise, ignore the warning and click Next
Let’s configure the Health Check. This will depend on the server you are using. Later on, we’ll install Nginx for our demo purposes, but if you’re using your own, you’ll have to configure yours separately. Keep in mind, if your server is not listening on port 80, you’ll need to update not only the the ELB listener above but also the App security group as well.
Configuring the Health check, we’ll make it really simple for demo purposes. For production system(s), you’ll want to think this one through and do what makes the most sense to you. Here’s ours:
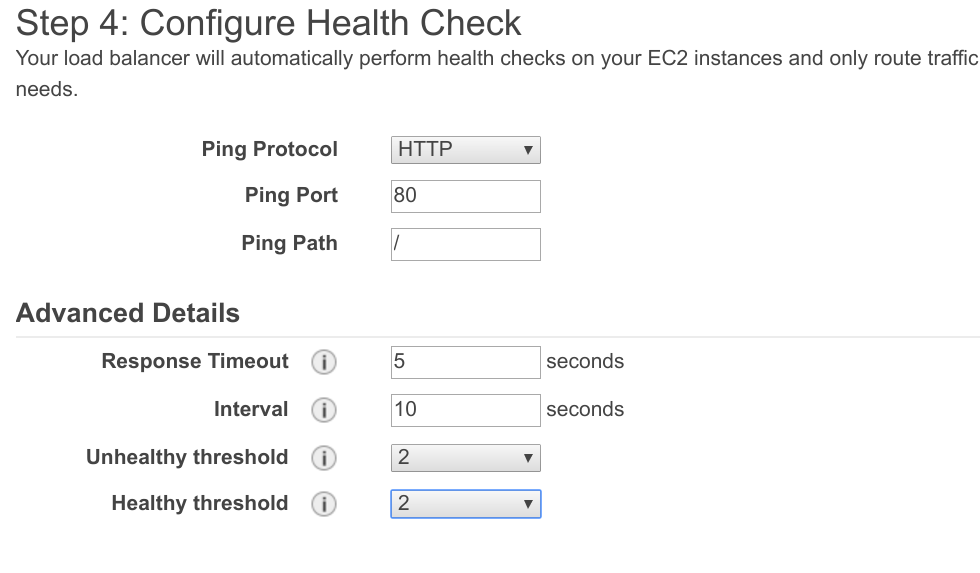
Click on Add EC2 Instances and select our running instance that we created above.
Click Add Tags and add any tags you like, click Review and Create and Create buttons.
NAT
Time to create a NAT gateway that will allow our application to access the internet from inside the VPC. We do this by creating a NAT Gateway.
Navigate to Services -> Networking & Content Delivery -> VPC -> NAT Gateways and click Create NAT Gateway.
- Under Subnet, type in nat-1 and select the one we created above from drop down
- Click Create New EIP
- Click Create
- Click Edit Routes Table
Select app route table, click on Routes tab and click Edit.
Add a route with Destination of 0.0.0.0/0 and Target the NAT gateway we created, it’ll pop up in the drop-down for you. Click Save.
If you are using both availability zones, follow the instructions above to create another NAT Gateway in the other AZ using nat-2 subnet and add it to the app route table just as the first one.
SSH
Before we can test anything, we need to setup SSH access and we’ll use a Bastion server for this. You can find lots of information about bastion servers through Google, for our purposes, we’ll keep it simple.
We’ll launch another EC2 instance that will be our our Bastion server by going to Services -> Compute -> EC2. Click on Launch instance and pick the Ubuntu Server AMI. Select type you like, t2.micro is a fine choice here and click on Configure Instance Details.
Select our VPC for the network and our bastion subnet. Under Auto-assign Public IP, select Enable. Click Add Storage and adjust as desired, then click Add Tags.
Once you’re satisfied with the tags, click Configure Security Groups. Select existing security group and choose our bastion security group.
Click Next, select the key you want to use to login with and click Launch.
Wait for the instance to show running state and then let’s ssh into it. Using your client, the user is ubuntu and the IP is the IPv4 Public IP in the Description tab for your bastion instance.
ssh ubuntu@<public IP>
Once you’re in, let’s ssh into our app server. Click on the app server in the list and find it’s Private IP, it should be 10.0.0.X.
ssh 10.0.0.X
It should drop you into the application server without any errors.
To test out our ELB, let’s install Nginx so we have something to test against.
sudo apt install nginx
Testing
Now that Nginx is installed and running, we need to make sure our ELB picked up our instance. Go back to ELB section by going to Services -> Compute -> EC2 and select Load balanacers in left-hand menu.
Select our load balancer and click on Instances tab. It will take about 30 seconds for the instance status to change from OutOfService to InService. We need to wait until it’s in service before we can do anything else.
Once it’s showing as InService, click on Description tab, copy DNS name and paste it into a browser tab URL. You should get a Welcome to nginx! page.
If you hit any issues, double-check your security groups first, then your route tables.
Fini
At this point, you have a basic VPC for a web application that you can expand
on.
Thanks for this excellent walk-through. I found it easier to follow then the official AWS documentation.
Kind regards,
Jan